> ## Documentation Index
> Fetch the complete documentation index at: https://docs.zeroagent.io/llms.txt
> Use this file to discover all available pages before exploring further.
# Quickstart
> Learn how to connect apps and get started with ZeroAgent
export const Banner = () => {
return
Get Started for Free
Make your Online store and Websites smarter and more interactions with AI Agents
;
};
# 1. Shopify
This Quickstart guide will help you connect Zeroagent to Shopify Store and start assisting your customers with Shopping Agents.
### Step 1: Access the Zeroagent Console
* **Log in** to your Zeroagent account.
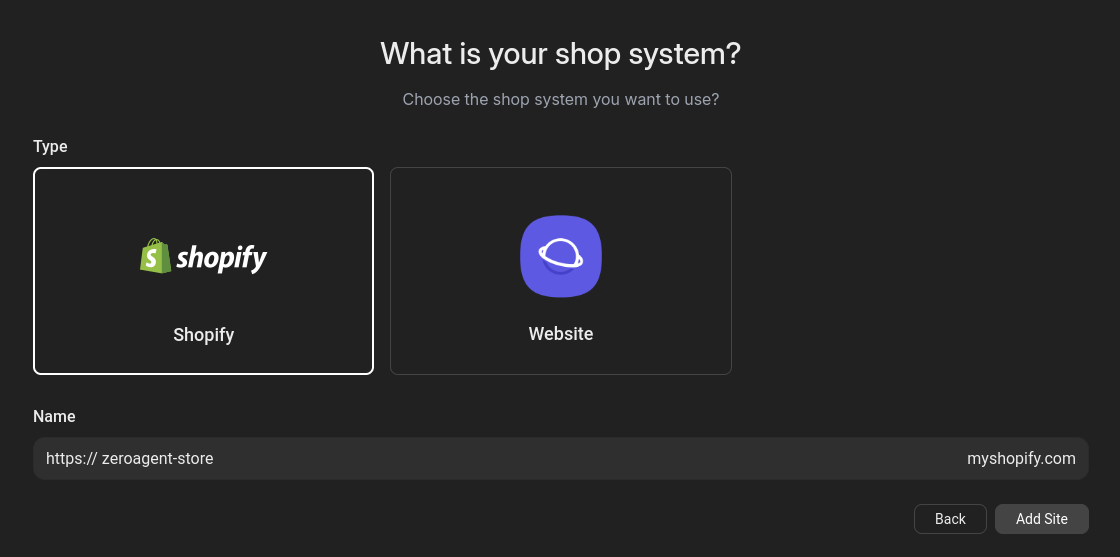
### Step 2: Select Type
* Select `Shopify` and enter your `shopify store name`.
```title="example" theme={null}
https://.myshopify.com
```
### Step 3: Authorize Store Acess
* You will be redirected to authorization page. This will install our `zeroagent shopify extension` to your shopify store.
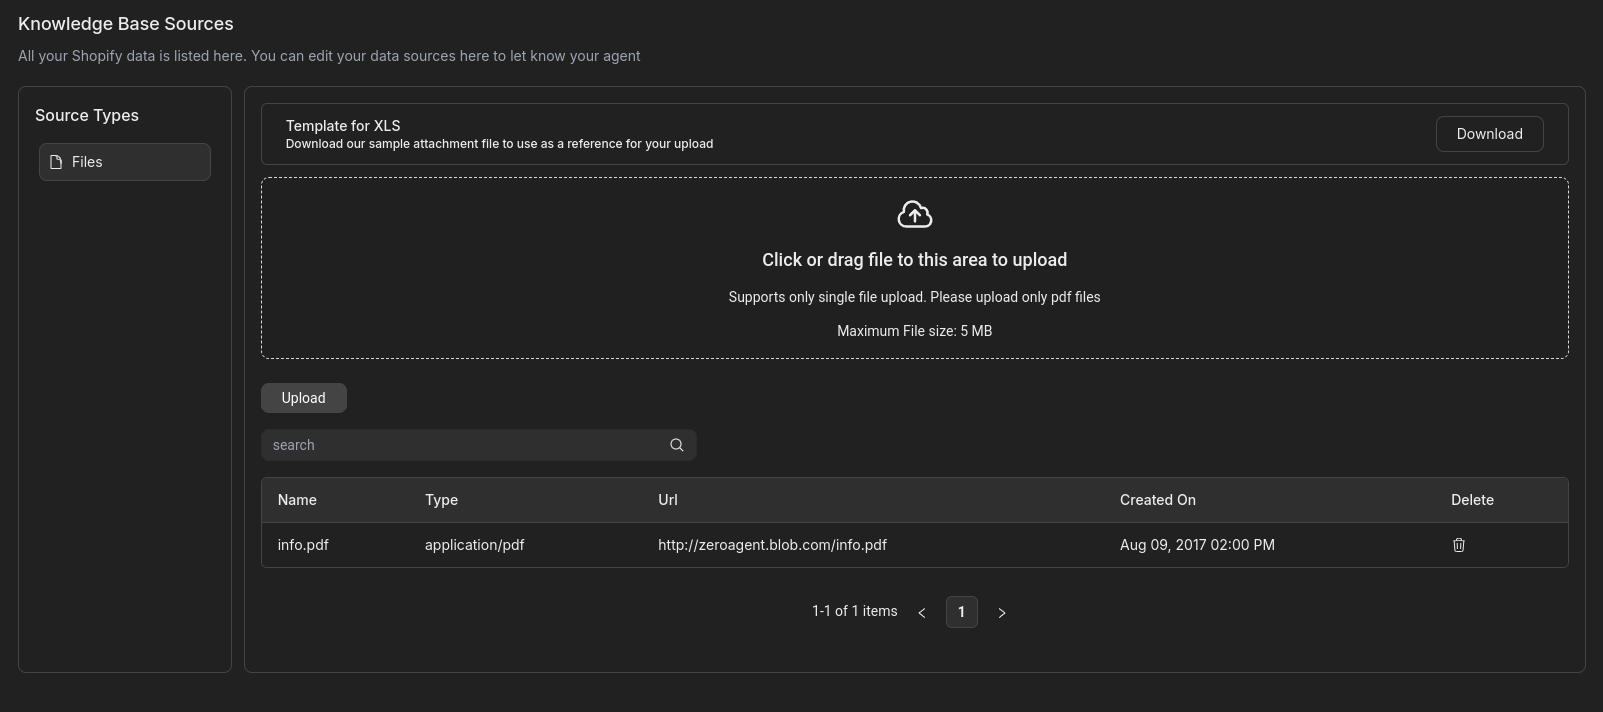
### Step 4: AI Knowledge Base
* All your `Shopify Store Products` are added to the AI Knowledge Base. You can also add FAQs, and other addtional information about your store.
You can only use **pdf files** to add additional information about your store.
### Step 5: Customise AI Chat Widget
* In the **Chat Widget** section, you can update the `store name` , `store placeholder` and `store theme`.
### Step 6: Start Using Your AI Agent
* Your AI Shopping Assistant is deployed on your store and is ready to help customers while shopping.
* AI Shopping Assistant will provide personalized product recommendations, handle orders, answer queries, and more for your customers.
# 2. Other Webpages
This Quickstart guide will help you connect Zeroagent to Shopify Store and start assisting your customers with Shopping Agents.
### Step 1: Access the Zeroagent Console
* **Log in** to your Zeroagent account.
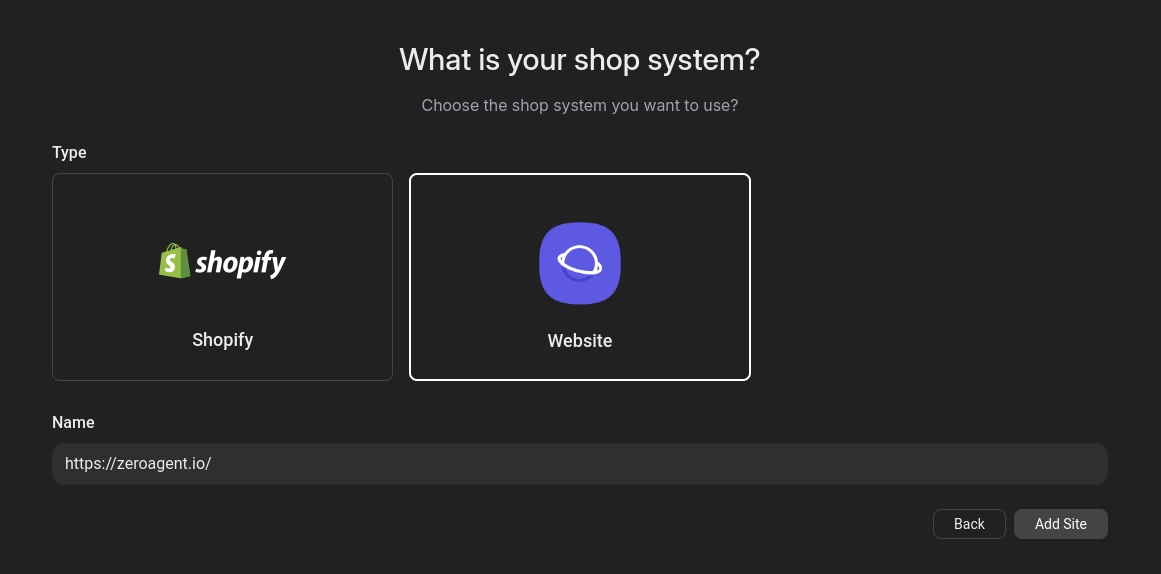
### Step 2: Select Type
* Select `Website` and enter your `domain name` or custom coded `store domain name`.
### Step 3: Embed SDK in App
Use the below code to embed the chat widget script code in your applications HTML file.
```js HTML theme={null}
```
```js Next theme={null}
// install package
npm install @zeroagent/js
// code
'use client';
import Zeroagent from '@zeroagent/js';
'} appKey={''} />
```
```js Vue theme={null}
// index.html [Recommended]
(or)
// peer-dependency: react package required
npm install @zeroagent/js react
// code
import Zeroagent from '@zeroagent/js';
'} appKey={''} />
```
```js React theme={null}
// install package
npm install @zeroagent/js
// code
import Zeroagent from '@zeroagent/js';
'} appKey={''} />
```
```js React TS Hardcore theme={null}
...
useEffect(() => {
const script = document.createElement('script');
script.src = 'https://cdn.jsdelivr.net/npm/@zeroagent/js@latest/dist/index.js';
script.async = true;
script.onload = () => {
if ((window as any).Zeroagent) {
(window as any).Zeroagent('', '');
} else {
console.error('Zeroagent is undefined');
}
};
document.body.appendChild(script);
const widgetDiv = document.createElement('div');
widgetDiv.id = 'zeroagent-ai-widget';
document.body.appendChild(widgetDiv);
return () => {
document.body.removeChild(script);
document.body.removeChild(widgetDiv);
};
}, []);
...
```
### Step 4: AI Knowledge Base
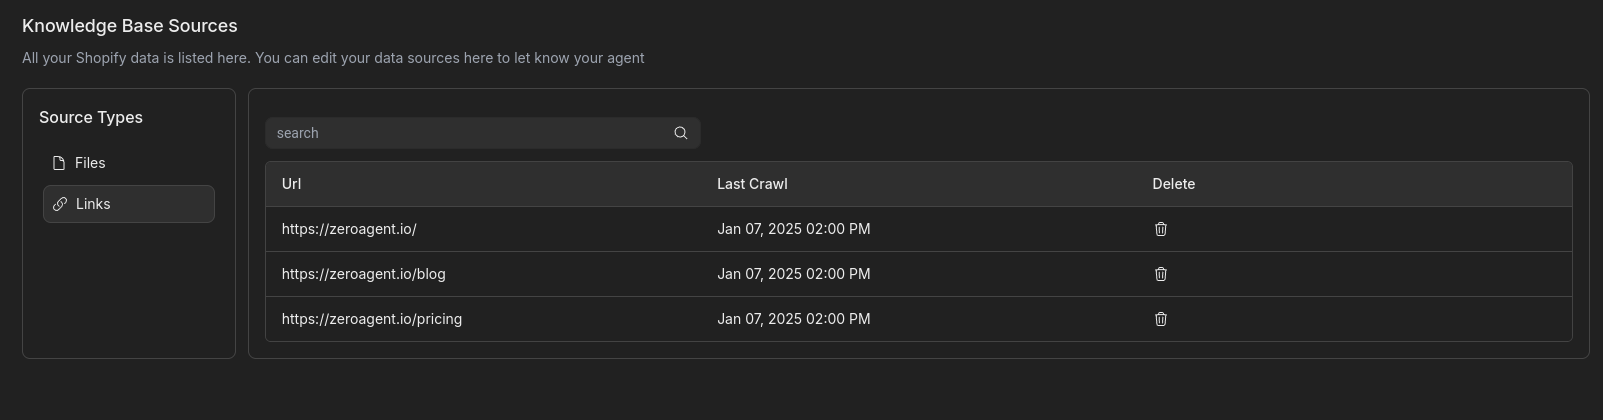
* Our system **automatically crawls** all the URLs on your website and adds the content to the AI Knowledge Base. You can view all the crawled pages in the Knowledge Base section.
* Additionally, you can upload your own data to the AI Knowledge Base through the Files section.
To use products as part of the AI Knowledge Base, ensure you upload them in the specified **XLS** format
### Step 5: Customise AI Chat Widget
* In the **Chat Widget** section, you can update the `store name` , `store placeholder` and `store theme`.
### Step 6: Start Using Your AI Agent
* Your AI Agent is deployed on your webpages and is ready to help customers while users. AI Agents will assits users on your queries & answers them, and more for your users.
## Explore Resources
Ensure accuracy and control over the actions
Learn how to get started with business apps
 ### Step 3: Authorize Store Acess
* You will be redirected to authorization page. This will install our `zeroagent shopify extension` to your shopify store.
### Step 4: AI Knowledge Base
* All your `Shopify Store Products` are added to the AI Knowledge Base. You can also add FAQs, and other addtional information about your store.
### Step 3: Authorize Store Acess
* You will be redirected to authorization page. This will install our `zeroagent shopify extension` to your shopify store.
### Step 4: AI Knowledge Base
* All your `Shopify Store Products` are added to the AI Knowledge Base. You can also add FAQs, and other addtional information about your store.
 ### Step 3: Embed SDK in App
Use the below code to embed the chat widget script code in your applications HTML file.
### Step 3: Embed SDK in App
Use the below code to embed the chat widget script code in your applications HTML file.
 ### Step 5: Customise AI Chat Widget
* In the **Chat Widget** section, you can update the `store name` , `store placeholder` and `store theme`.
### Step 6: Start Using Your AI Agent
* Your AI Agent is deployed on your webpages and is ready to help customers while users. AI Agents will assits users on your queries & answers them, and more for your users.
## Explore Resources
### Step 5: Customise AI Chat Widget
* In the **Chat Widget** section, you can update the `store name` , `store placeholder` and `store theme`.
### Step 6: Start Using Your AI Agent
* Your AI Agent is deployed on your webpages and is ready to help customers while users. AI Agents will assits users on your queries & answers them, and more for your users.
## Explore Resources